
The Pro Christmas Tree Layering Sequence and Decor Guide
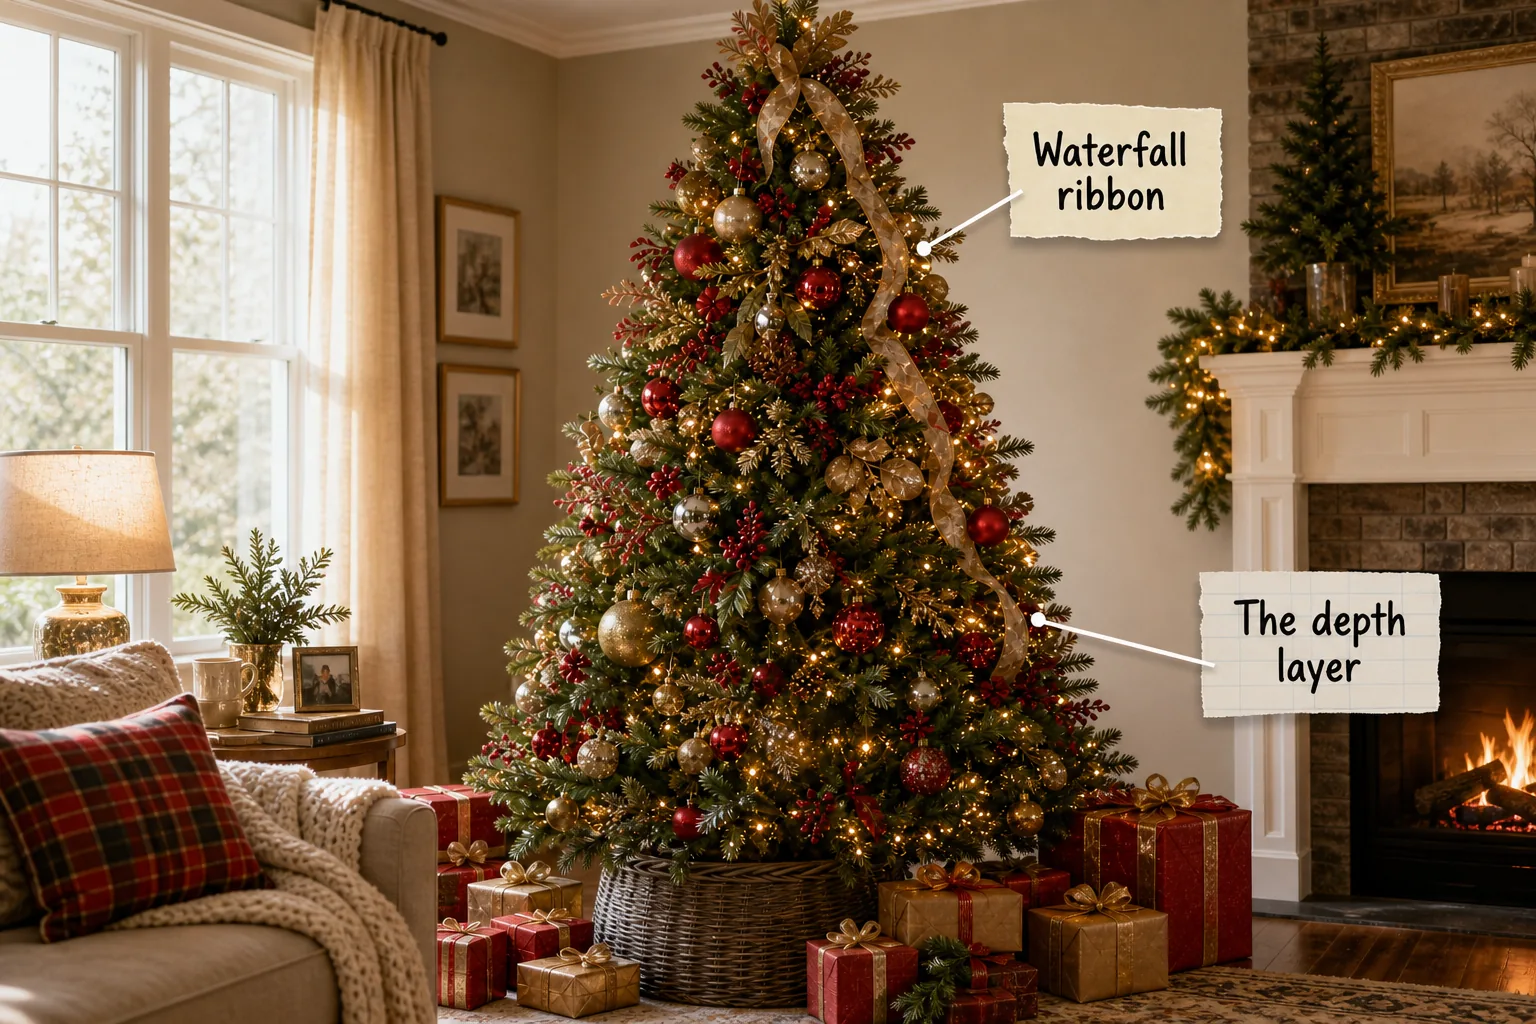
Master the step-by-step professional Christmas tree layering sequence to build a perfectly balanced, glowing holiday centerpiece with absolute confidence. You will learn exactly how to cascade ribbon, space matching ornaments, and decorate your tree from the inside out using proven professional techniques.
The Step-by-Step Layering Sequence
The secret to a flawlessly decorated holiday centerpiece lies in a strict assembly order, moving systematically from the inner trunk to the outer branch tips. Following this exact professional layering sequence establishes the rigid structural foundation required for heavier decorations.
- String the lights deeply along every single branch to create a luminous, glowing core.
- Embed highly reflective depth-layer ornaments near the central trunk to bounce ambient light.
- Tuck massive anchor ornaments securely into the lower branches to build visual weight.
- Weave wired waterfall ribbon in cascading, billowy loops down the entire vertical length.
- Apply delicate specialty drops and matching visual triangles carefully to the outer tips.
- Install the tree collar or fabric skirt to ground the final heavy design.
Always begin by staging your materials, unpacking every box, and separating your ornaments by size and finish before applying the very first layer. This comprehensive preparation prevents you from digging through stacked bins while balancing delicate glass pieces.

Before applying the first layer of decor, prepare your canvas to ensure the structural elements are completely ready to support heavy ornaments. Fluffing the artificial branches rigorously ensures no visible gaps remain in the artificial greenery before beginning.
Selecting a Cohesive Palette
Limiting your primary color palette to three distinct hues prevents the finished design from feeling chaotic and visually overwhelming. Selecting one dominant metallic finish and two complementary accent colors ensures the massive anchor points harmonize perfectly with the delicate outer drops.
Building the Depth Layer
The foundation of a professional design relies on the depth layer, which creates a glowing core that radiates warmth from the center of the tree. Wrapping lights tightly along the branches near the trunk eliminates dark hollows completely.

Push 15 to 20 basic, highly reflective shatterproof ornaments deep into the interior gaps, resting them securely against the central pole. These hidden baubles act as internal mirrors, bouncing the ambient string lighting outward through the dense exterior branches.
Testing the Light Distribution
Before introducing the heaviest decorative elements, step back and squint at the illuminated canvas to identify any dark spots or uneven bulb spacing within the core. Proper light density is absolutely critical for highlighting the interior reflective baubles effectively.
| Tree Height | Minimum Light Count | Depth Ornament Count | Ribbon Yardage |
|---|---|---|---|
| 6 to 7 feet | 600 to 700 bulbs | 12 to 15 baubles | 10 to 15 yards |
| 7.5 to 8.5 feet | 800 to 900 bulbs | 15 to 20 baubles | 15 to 20 yards |
| 9 to 10 feet | 1,000 to 1,200 bulbs | 20 to 25 baubles | 25 to 30 yards |
| 10 to 12 feet | 1,500 to 2,000 bulbs | 30 to 40 baubles | 35 to 40 yards |
Adjust any dense clusters of bulbs by gently pulling the wired branches apart, ensuring the inner glow casts a perfectly even silhouette. Consistent 4-inch spacing between light strands guarantees a beautifully balanced backdrop for the upcoming heavy layers.
Placing the Anchor Points
Establish the primary visual weight by placing anchor points, which are the largest, heaviest ornaments in your collection. Distributing these massive pieces early in the process prevents them from dragging down the delicate outer tips and ruining the silhouette.

Tuck 5 to 7 massive ornaments deeply into the lower two-thirds of the tree where the structural branches are thickest. Nestling them securely against multiple sturdy needles ensures these heavy statement pieces remain perfectly stable throughout the entire holiday season.
Weaving the Waterfall Ribbon
Introduce dramatic vertical movement by cascading a wide, wired waterfall ribbon down the exterior profile of the greenery. Pinching and tucking the fabric deep into the branches every 12 to 18 inches creates luxurious, billowy loops that draw the eye downward.

Ribbon adds incredible volume and movement to the overall silhouette, but applying it incorrectly can quickly ruin the natural shape of the tree. Wired edges are absolutely essential for maintaining the structural integrity of the cascading fabric loops over time.
Spacing with Visual Triangles
How do you achieve perfect balance with a visual triangle? You space matching statement ornaments in a staggered, diagonal formation to force the viewer’s eye to travel continuously across the entire decorated canvas without resting on one spot.

Placing three identical colored ornaments in this deliberate geometric pattern prevents heavy color blocks from forming on one side. Maintain at least 18 inches of diagonal separation between matching pieces to keep the overall distribution feeling incredibly organic and balanced.
Creating the 3-to-1 Ratio
Build striking focal points by utilizing the 3-to-1 ratio, which involves grouping three varied ornaments together on a single branch. Combining differing textures, sizes, or finishes allows the cluster to act as one high-impact, custom statement piece among the standard decor.

Clustering ornaments creates beautiful custom statement pieces out of standard baubles, provided they are secured tightly together and distributed evenly through the middle third. Mixing a matte sphere, a shiny globe, and a textured finial guarantees the arrangement pops vividly.
Securing the Tree Topper
Install your chosen tree topper before hanging the delicate outer ornaments to prevent knocking fragile glass off the tips while reaching upward. Securing the topper early ensures you can safely use a step ladder without brushing against the meticulously placed visual triangles.
Filling the Outer Branch Tips
The final decorative layer consists of delicate, specialty, and sentimental ornaments positioned carefully on the outermost branch tips. Placing these fragile pieces last ensures they remain completely unobstructed and entirely safe from the heavy structural maneuvering done earlier in the sequence.

Leave at least 2 inches of clearance below hanging drops and elongated finials so they dangle freely without resting on lower needles. This precise spacing allows the delicate glass to sway naturally and catch the twinkling lights as people walk past.
The Final Polish and Skirt
Finish the comprehensive layering sequence by addressing the base of the tree, which grounds the heavy upper design visually. A structured, woven tree collar provides a clean, modern foundation that effortlessly hides messy electrical cords, power strips, and bulky metal stands.

If utilizing a traditional fabric skirt instead of a rigid collar, ensure the material extends 4 to 6 inches past the lowest branches. This generous proportion creates a luxurious, anchored base that perfectly balances the massive visual weight of the upper canopy.