Cedar Soffit Installation Guide and Yearly Oil Schedule
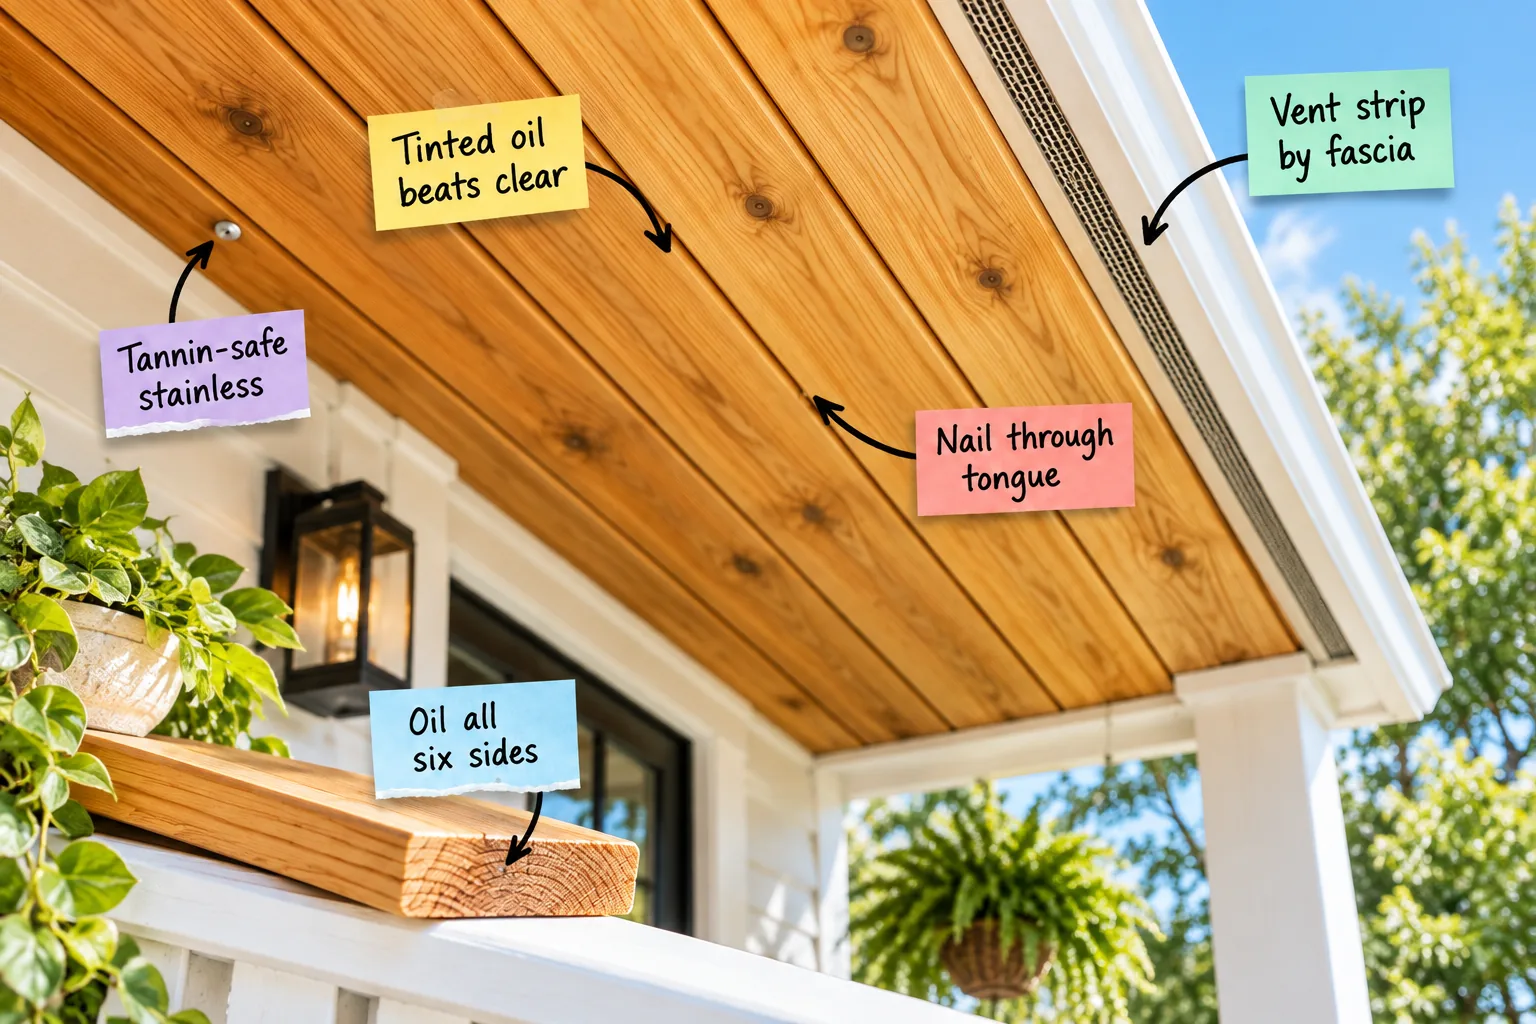
You will be able to install a glowing cedar porch ceiling and keep it protected year after year using our exact maintenance timeline, so grab our printable two-page Cedar Soffit Install & Oil Schedule for flawless results. We will follow the complete installation process from pre-treating the raw boards to setting the final vent strip and planning future upkeep.
Unpacking and Acclimating the Wood
Never install raw cedar immediately after it arrives from the lumberyard, as the moisture content needs time to balance with your local environment. Stack the boards on your covered porch for at least 48 hours to let them acclimate, which prevents dramatic shrinking after installation.
Sorting Boards by Grain Pattern
Take a few minutes to sort through your delivery and group the boards by color variation and grain density before you start cutting. Distributing the dark and light pieces evenly across the ceiling creates a beautifully balanced, natural aesthetic rather than a patchy, disjointed surface.
Seal Every Surface Before Installation
Coating the boards before they go up is the most important step for longevity, so apply oil to the face, back, edges, and end grain for complete protection. I learned this the hard way on my first Austin patio project when untreated backs warped after a humid spring.

It is tempting to rush the prep work and only finish the face that everyone will see, but skipping the hidden sides invites structural issues down the road.
Creating a Staging Area for Wet Boards
Setting up a proper drying rack prevents debris from ruining your fresh finish while the oil penetrates the wood fibers. Space your sawhorses exactly 48 inches apart to support standard cedar lengths without sagging while they cure.
| Board Length | Sawhorse Spacing | Support Points | Cure Time |
|---|---|---|---|
| 8 feet | 48 inches | 2 | 24 hours |
| 10 feet | 40 inches | 3 | 24 hours |
| 12 feet | 48 inches | 3 | 24 hours |
| 16 feet | 48 inches | 4 | 24 hours |
Choosing the Right Brush for Penetrating Oil
A high-quality natural bristle brush holds more finish and works the penetrating oil deep into the porous cedar grain much better than synthetic alternatives. Brushing along the entire length of the board ensures a smooth, unbroken finish without visible stop marks.
Wiping Excess Oil to Prevent Tacky Surfaces
Penetrating oils are designed to soak into the wood, not sit on top of it like a traditional varnish or polyurethane. Always wipe away any unabsorbed finish with a clean, lint-free rag after 15 minutes to prevent the surface from drying into a sticky, dust-catching mess.
Why Tinted Oil Outperforms Clear Finishes
A lightly pigmented semi-transparent penetrating oil provides essential UV protection that clear finishes completely lack. The added pigment blocks the sun’s rays, keeping the cedar glowing honey-brown rather than fading to a weathered gray.

Testing the Pigment Density
Always test your chosen finish on a scrap piece of cedar to verify the color depth before committing to the entire ceiling. The natural golden tones of the wood will interact with the pigment, making a honey-tinted oil appear much warmer once fully absorbed.
The Non-Negotiable Stainless Steel Rule
Cedar contains natural tannins that will rapidly corrode standard galvanized fasteners, leaving permanent black streaks down the wood. Always specify 304 or 316 stainless steel ring-shank nails to keep the surrounding wood clean and evenly toned.
Selecting the Correct Fastener Length
For standard 1×4 or 1×6 tongue-and-groove cedar, use a 2-inch stainless nail to guarantee sufficient bite into the ceiling joists. This length accounts for the thickness of the board and provides at least 1.25 inches of solid structural holding power without poking through the roof deck.
Calibrating Your Pneumatic Nailer
Set your air compressor to 80 to 90 PSI to drive the ring-shank nails perfectly flush with the tongue without splitting the delicate edge. Test the depth on a scrap piece first, adjusting the tool until the fastener sits perfectly flat against the wood.
Blind-Nailing Through the Tongue
To achieve a seamless ceiling, drive the stainless nails at a 45-degree angle directly through the tongue of each board. This hidden fastener technique secures the wood while completely concealing the nail head once the next grooved board slips into place.

Managing Warped or Bowed Boards
Even premium cedar bundles contain a few stubborn pieces that require gentle persuasion to lock tightly into the preceding groove. Tap a sacrificial scrap block against the grooved edge to force the bowed board straight without crushing the visible profile with your hammer.
Starting the First Board Perfectly Straight
The alignment of your entire ceiling relies entirely on the very first board you install against the house wall. Snap a chalk line exactly parallel to the wall to ensure this starter piece is perfectly straight, adjusting for any waves in the exterior siding.
Cutting Around Recessed Porch Lights
When you encounter a recessed lighting fixture, use a jigsaw to carefully trace and cut the circular opening across the joined boards. Always seal these fresh, curved cuts with a quick brush of penetrating oil before pushing the light housing back into place.
Selecting the Ideal Fascia Board Material
The fascia board caps the outer edge of your rafters and creates a clean border for your new cedar ceiling. Choosing a smooth, pre-primed pine or fiber cement board provides a crisp white contrast that makes the glowing wood tones pop beautifully.
Painting Fascia Before Installing Soffit
Apply your final coats of exterior white paint to the fascia boards before you begin nailing up the cedar planks. This simple sequencing trick eliminates the frustrating task of cutting in with a paintbrush upside down while trying to protect your fresh oil finish.
Integrating the Continuous Vent Strip
A wood soffit still needs to breathe to prevent attic rot, so install a slim, 2-inch continuous screened vent strip along the outer edge. Setting this strip just inside the fascia board maximizes intake airflow, a trick that saved my own porch roof during a sweltering Texas summer.

Calculating Required Ventilation Area
To ensure your attic stays dry, measure your total ceiling footprint to verify the continuous strip provides enough net free vent area. Most building codes require 1 square foot of ventilation for every 150 square feet of attic space, balanced between intake and exhaust.
Securing the Screened Vent
Fasten the aluminum or vinyl vent strip tightly against the fascia using short stainless staples or brad nails spaced every 12 inches. Keeping this barrier perfectly flush prevents wasps and small pests from bypassing the screen and nesting above your new ceiling.
Navigating Porch Corners and Transitions
When boards meet at a 45-degree mitered corner, precision cutting ensures a professional, symmetrical finish that draws the eye outward. Always measure from the longest point of the angle to maintain the continuous V-groove pattern perfectly aligned across the entire porch wrap.
Trimming Factory Ends for Clean Joints
Never trust the factory cuts on the end of a cedar plank to be perfectly square or free of shipping damage. Shave a quick 1/4 inch off every board end with your miter saw before installation to guarantee tight, flawless butt joints.
Installing Crown Molding at the Wall Transition
If the gap between your cedar ceiling and the exterior siding looks uneven, a simple piece of trim easily hides the discrepancy. Nail a small cedar cove or crown molding directly to the wall to cover the perimeter gap while allowing the ceiling to float freely.
Your Printable Cedar Oil Schedule
Managing mitered corners and transition seams with a 1/8-inch expansion gap is just one detail covered in our complete guide. Download our two-page Cedar Soffit Install & Oil Schedule to master the initial six-sided oiling, blind-nailing steps, and vent placement.

Keep this timeline handy to ensure your wood stays protected through every season without guessing when the next coat is due. I printed mine and taped it inside the utility closet, which takes all the stress out of planning my maintenance weekends.
Inspecting the Finish Annually
Grab a ladder every spring to visually inspect the ceiling for water spots, mildew, or areas where the oil has noticeably thinned. Catching these minor wear patterns early allows you to touch up isolated sections before the raw wood becomes permanently discolored from exposure.
Cleaning Mildew Before Recoating
If you spot black mildew dots on the surface, you must kill the spores before applying a fresh coat of oil. Wash the affected area with a mild oxygen bleach solution, letting it sit for 10 minutes before rinsing it away with a damp sponge.
Why Power Washing Damages Soft Cedar
Never use a high-pressure power washer to clean your soffit, as the intense spray will effortlessly gouge the soft cedar fibers. Hand scrubbing with a soft bristle brush is the only safe way to lift dirt without destroying the smooth, milled texture of the wood.
Prepping for a Maintenance Coat
When the time comes for a fresh application, you must thoroughly clean the boards with a specialized wood brightener to remove surface dirt. Scrubbing the ceiling restores the original pH balance and opens the wood pores to accept the new layer of oil.
Protecting Porch Floors During Maintenance
Working overhead means drips are inevitable, so you must lay down heavy canvas drop cloths to protect your decking or concrete patio. Avoid thin plastic sheeting, which becomes dangerously slippery when coated in spilled penetrating oil.
Applying Oil Over an Existing Finish
Unlike the heavy saturation required during the initial six-sided prep, a maintenance coat only demands a light, single pass over the exposed face. Wipe away any excess finish after 15 minutes to prevent a tacky, shiny buildup that attracts airborne dust.
Storing Leftover Oil Safely
Transfer any remaining penetrating oil into a smaller, airtight metal container to minimize oxygen exposure and prevent the finish from skinning over. Store the can in a temperature-controlled garage or basement to ensure the oil remains perfectly viable for your next touch-up.
Long-Term Weathering Expectations
Even with perfect installation, sun and weather exposure dictate your long-term maintenance and recoating frequency. South-facing eaves receive harsher daily UV rays, and I usually have to recoat my own south-facing porch two years earlier than the shaded northern side.

More Stunning Wood Soffit Ideas
Explore these different wood species and finish combinations to find the perfect match for your home's exterior.
Modern Matte White Oak: White oak offers a pale, sophisticated grain that perfectly complements high-contrast modern farmhouse exteriors.

Mid-Century Rich Walnut: A dark walnut stain on smooth pine instantly grounds an entryway with moody, retro-inspired warmth.

Coastal Whitewashed Beadboard: Whitewashed beadboard keeps a covered porch feeling exceptionally bright and airy while retaining subtle wood texture.

Rustic Rough-Sawn Cedar: Embrace a rugged aesthetic by using rough-sawn cedar that adds incredible tactile depth to cabin architecture.

Contemporary Ebony Slat Wood: Narrow wood slats finished in a striking ebony stain create a dramatic, highly architectural shadow line.