Garage Conversion Guide: Turn Your Car Door into a Bright Room
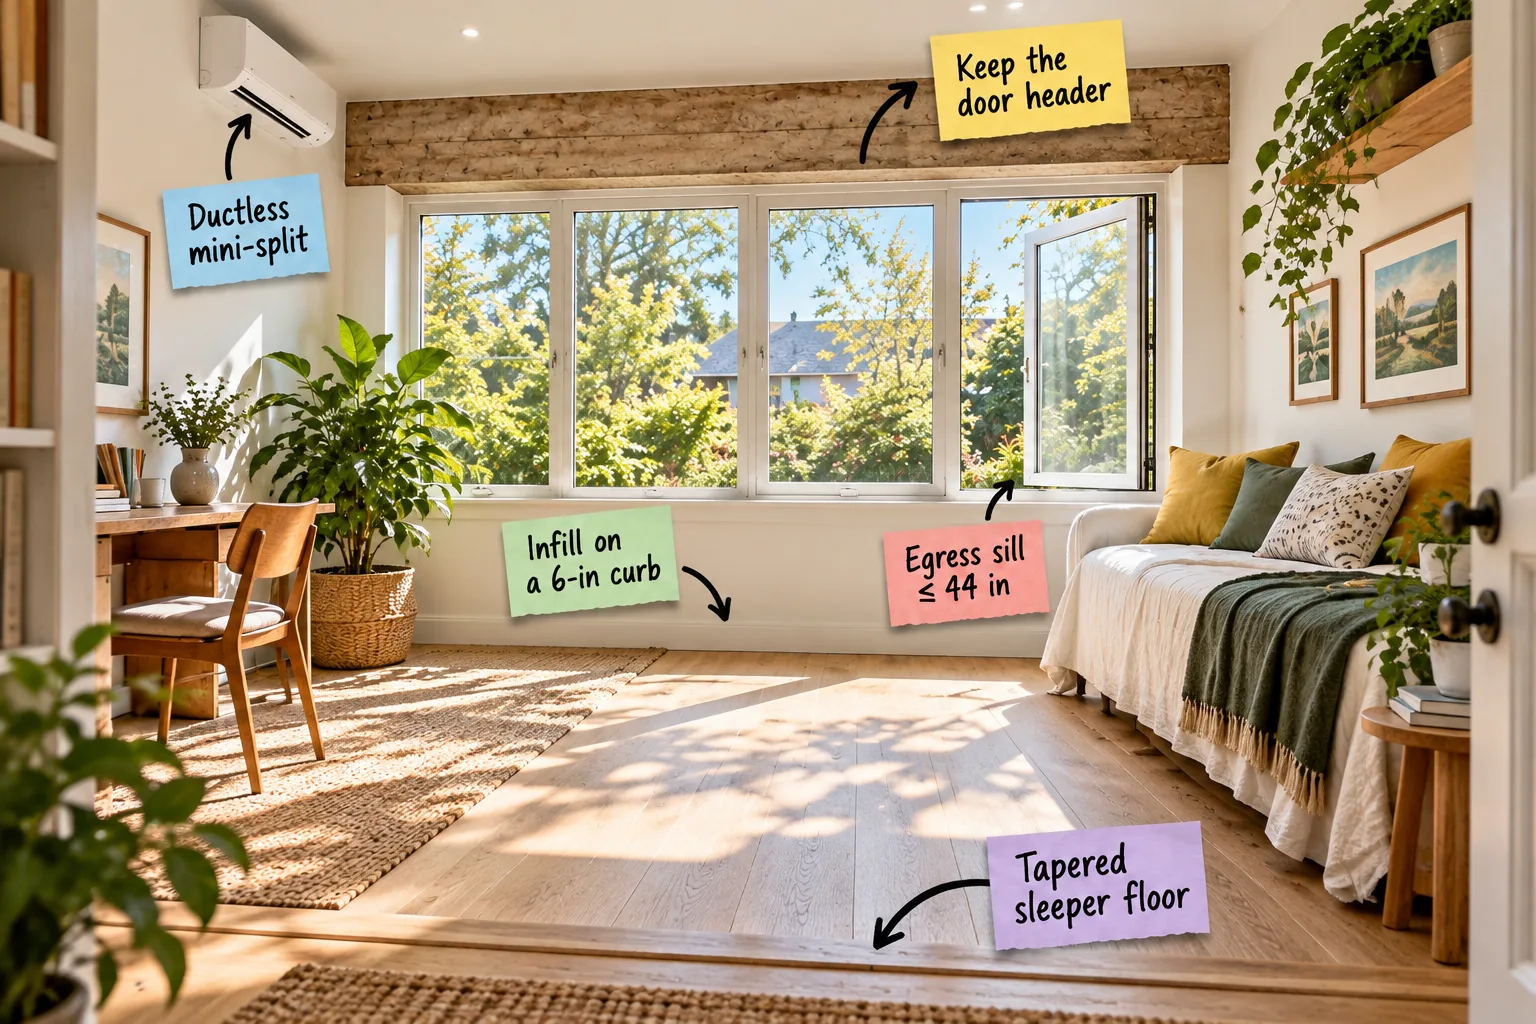
Planning a garage conversion means following a strict order of operations, which is exactly why you can download our complete Garage-to-Room Build Sequence checklist to successfully frame, insulate, and finish your new step-free living space without failing a single municipal inspection along the way.
The Complete Build Sequence
When we converted our Austin garage last spring, having a strict structural assembly order mapped out on paper kept us from tearing out fresh drywall just to fix easily avoidable missed rough-in inspections with the local city permit office.

Before you pull a single building permit, hire a contractor, or order expensive lumber, you must verify that your existing concrete and framing structure can legally and safely support a fully conditioned, permanent living space.
Evaluating the Existing Foundation
Your new living room requires an incredibly solid base, so meticulously mapping out any existing slope, water damage, or deep settling dictates exactly how much concrete leveling work lies ahead before framing begins.
| Concrete Condition | Action Required |
| Hairline surface cracks | Fill with epoxy sealant |
| Quarter-inch gaps | Consult structural engineer |
| Heavy pitting | Apply self-leveling compound |
Addressing these foundational concrete issues early prevents disastrous moisture intrusion during heavy rainstorms and ensures your new wooden subfloor rests on a perfectly stable, permanently dry surface for decades.
Planning the Interior Layout
Before framing a single wall, taping out your planned furniture arrangement directly onto the bare concrete floor ensures your new electrical outlets and lighting fixtures will align perfectly with your future daybed and desk setup.
Planning the Electrical Layout
Most original garage subpanels completely lack the amperage required for modern living spaces, making a heavy-up to a 100-amp dedicated electrical service absolutely essential for handling heavy climate control loads and multiple wall outlets.
Slab Moisture and Vapor Control
Garages are universally notorious for damp concrete slabs, so always tape a tight 2-foot square of clear plastic to the concrete for 48 hours to check for trapped condensation before you ever start building.

- Sweep the concrete completely clean of all dust, dirt, and sharp debris.
- Roll out the 6-mil poly sheeting, overlapping the edges by at least six inches.
- Seal every seam tightly with acoustic tape to block all ground moisture.
Always install this incredibly vital, continuous 6-mil poly vapor barrier over the entire exposed slab, painstakingly taping every single seam to permanently block ground moisture from reaching your new wood framing.
Once your heavy-duty vapor barrier is completely secured and inspected, you can confidently begin calculating the custom framing angles needed for your tapered sleeper floor to match the existing interior house threshold perfectly.
Insulating the Concrete Floor
Laying thick, rigid foam board insulation directly over the fully sealed vapor barrier between the wooden sleepers prevents the finished oak floor from feeling like an unyielding ice rink during the colder winter months.
Leveling Up: The Tapered Sleeper Floor
Standard garage floors typically drop about 1/8 inch per foot toward the driveway to actively shed rainwater, which unfortunately creates a highly noticeable, uncomfortable slant in any finished interior living space.

Ripping your pressure-treated 2x4s at a very specific custom angle counteracts this aggressive slope, resulting in a perfectly flat, tapered sleeper floor that meets the main house hallway threshold seamlessly and safely.
Securing the Subfloor Panels
Liberally gluing and tightly screwing thick, tongue-and-groove plywood subfloor panels across your newly leveled wooden sleepers creates a rigid, squeak-free foundation that is entirely ready to accept your final decorative oak planks.
Selecting the Right Flooring Material
Choosing an engineered oak hardwood over solid wood planks provides significantly better dimensional stability against any lingering ambient moisture that might naturally fluctuate within the newly conditioned concrete slab environment.
Pouring the 6-Inch Window Curb
When I tackled my own conversion, pouring the heavy infill on a 6-in curb directly over the existing slab felt intimidating, but it expertly elevated the wooden sill plate safely above standing driveway water.
Anchoring the Sill Plate
Securing a thick, pressure-treated sill plate directly to your freshly cured concrete curb with heavy-duty galvanized anchor bolts provides a rock-solid, completely rot-proof structural base for the massive new front window wall.
Keeping the Original Door Header
I was incredibly relieved to learn from our inspector that we could keep the door header exactly where it was, safely relying on the massive engineered beam already carrying the heavy roof load.

By carefully framing your new full-width window bank directly beneath this robust original beam, you brilliantly avoid thousands of dollars in structural engineering and complex framing costs while aggressively maximizing natural daylight.
Framing the New Window Wall
Building the new vertical stud wall directly beneath the original header requires incredibly precise tape measurements to ensure your custom glass window units slide into the rough openings perfectly square, level, and plumb.
Installing Exterior Siding
Matching the exterior cladding of your new window wall infill to the rest of your home’s original siding ensures the conversion looks like a seamless architectural addition rather than an obvious afterthought.
Meeting the 44-Inch Egress Rule
If your beautiful new conversion will ever serve as a legal bedroom, strict building codes require a secondary escape route providing a minimum net clear opening of exactly 5.7 square feet.

Crucially, the bottom edge of this mandatory clear opening must feature an egress sill ≤ 44 in, measured straight up from the finished interior floor surface to ensure a safe emergency exit.
Air Sealing and Wall Insulation
Thoroughly filling the deep stud bays with high-density fiberglass batts and meticulously sealing every tiny framing gap with expanding foam transforms the historically drafty garage into a tightly sealed, highly energy-efficient thermal envelope.
Upgrading the Garage Roof Insulation
Because most original garage ceilings lack proper thermal protection, blowing high-density cellulose insulation into the attic space above is absolutely critical for preventing massive heat loss during the freezing winter months.
Heating and Cooling with a Mini-Split
Tapping into your home’s existing central HVAC ductwork is rarely effective for a garage conversion, making a dedicated, wall-mounted ductless mini-split the absolute smartest, most reliable climate solution available today.

Mounting a highly efficient 9,000 to 12,000 BTU heat pump high on the side wall provides independent, whisper-quiet temperature control tailored exactly to your new single-car footprint throughout every changing season.
Routing the Refrigerant Lines
Punching a small, carefully sealed hole through the exterior wall framing allows the insulated copper refrigerant lines to connect the indoor head unit to the outdoor compressor seamlessly without compromising your weatherproofing.
Hanging and Finishing Drywall
Installing heavy half-inch drywall over the fully insulated studs finally hides the raw structural framing forever, while three meticulous coats of joint compound create perfectly smooth, paint-ready walls for your new studio.
Installing the Interior Doors
Hanging a solid-core interior door between the new studio and the main house hallway provides crucial acoustic separation, ensuring late-night television or early-morning calls never disturb the rest of the family.
Installing Trim and Baseboards
Wrapping the entire room in crisp white baseboards and elegant window casings beautifully bridges the visual gap between the painted drywall and the oak flooring, delivering a polished, highly professional architectural finish.
Painting and Priming the Space
Applying a high-quality, mold-resistant primer to the fresh drywall seals the porous joint compound, ensuring your final coats of warm interior paint roll on smoothly and cure to a highly durable, washable finish.
Upgrading the Exterior Lighting
Installing stylish wall sconces directly outside the new window bank not only boosts your home’s evening curb appeal but also provides essential security lighting across the newly paved driveway approach.
Moving In: The Finished Guest Studio
Once the messy structural work finally finished on our project, softening the bright, slightly echoey space with layered warm textiles and a plush velvet daybed was easily my favorite renovation milestone.

By intentionally matching the interior trim profiles and subtle paint colors to the rest of your home, the former utility garage feels like it was always meant to be a welcoming living space.
4 Ways to Style a Converted Garage
Once the structural work is done, the blank footprint can adapt to almost any purpose.
Moody cinematic home theater: Dark slate walls and heavy velvet curtains absorb sound and light, turning a windowless garage into the ultimate immersive screening room.

Bright and messy art studio: Embrace the durable concrete floor and add inexpensive plywood pegboards to create a hard-working, light-filled creative space where messes are welcome.

High-energy heavy lifting gym: Thick interlocking rubber floor tiles protect the concrete slab from heavy dropped weights, while wall-to-wall mirrors instantly double the visual size of the room.

Warm library and home office: Floor-to-ceiling built-in bookcases provide massive storage and acoustic dampening, transforming a cold box into a quiet, sophisticated workspace.